Rodent Nest Identification: How to Spot Rat & Mice Nests Early
A rodent nest is a loosely woven ball of shredded material — typically insulation, cardboard, fabric, or dried leaves — ranging from the size of a softball to a soccer ball. Rats and mice tuck these nests into dark, undisturbed voids like attics, wall cavities, crawl spaces, and storage boxes. By the time most homeowners notice scratching sounds or a stale ammonia odor, a breeding colony of 6–12 rodents has often been hiding for weeks. Knowing how to identify a rat nest or mice nest early is the fastest way to prevent costly structural damage and health risks.
This rodent nest identification guide breaks down exactly what a rat nest and mice nest look like, where rodents build them indoors and outdoors, how to spot an active rodent infestation early, and when to call a professional for safe rodent nest removal across California.
Understanding Rodent Shelters
A rodent shelter is a compact, woven structure built from whatever soft, shreddable material is available nearby. They do not carry building supplies far from the chosen site, so the composition is a direct reflection of what sits within a few feet of it. Indoors, that usually means fiberglass or cellulose insulation, cardboard, newspaper, fabric scraps, or shredded plastic sheeting. Outdoors, it shifts to dried leaves, grass clippings, mulch, and bark.
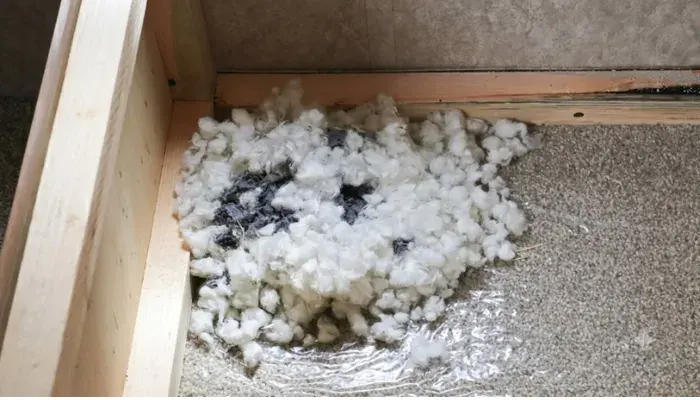
The finished shape is roughly ball-like, ranging from the size of a fist to the size of a soccer ball depending on how long it has been occupied and how many individuals are using it. Unlike a bird's nest, there is no visible entrance woven into its structure; they simply burrow into the mass, leaving a slightly hollowed center that stays warm and enclosed on all sides.
Materials They Prefer
- Fibrous insulation — shredded into fine strands for warmth
- Paper and cardboard — torn into strips rather than left in sheets
- Fabric and packing material — pulled from stored boxes or old clothing
- Dried plant matter — grass, leaves, and straw in outdoor or garage settings
- Plastic sheeting or insulation vapor barrier — chewed into pliable strips
If you are unsure whether you are dealing with roof rats or Norway rats, the location itself is one of the clearest clues. See our detailed comparison of roof rat vs Norway rat behavior and habits for a full breakdown.
Common Indoor Hideouts
Indoor sites share three qualities: darkness, minimal foot traffic, and proximity to a stable food or water source. These creatures are neophobic, meaning they avoid open, brightly lit, frequently disturbed areas whenever a quieter option exists nearby.
Attics and Roof Voids
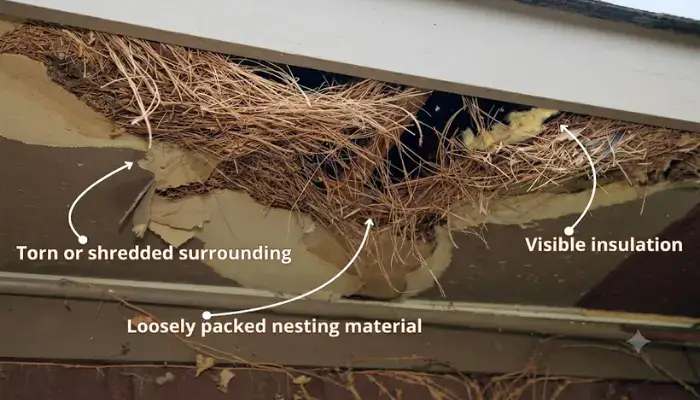
Roof rats in particular gravitate toward attic spaces, where loose insulation offers both material and thermal comfort. A hiding spot here is often tucked against a rafter joint or in a corner farthest from the attic access point, since that location is disturbed least often. If you suspect a rat nest in your attic, our attic rodent removal specialists can safely inspect and remove it.
Wall Cavities and Behind Cabinetry
Both species will settle inside wall voids when a gap around plumbing, wiring, or a foundation crack provides access. These are harder to detect visually and are usually confirmed first by sound — scratching, light thumping, or squeaking most active around dusk and just before dawn.
Garages, Sheds, and Storage Boxes
Cluttered storage areas are among the most common sites in residential properties because they are rarely disturbed for weeks or months at a time. Cardboard boxes, stacked fabric, and old furniture cushioning all make convenient material, and the clutter itself provides cover from predators and people alike.
Crawl Spaces and Beneath Structures
Norway rats favor crawl spaces and sub-floor areas more than their climbing counterparts do, since these ground-level voids match their natural burrowing tendency. A location here is frequently paired with a shallow burrow entrance visible from outside the foundation line.
Outdoor Nesting Locations
Outdoor sites are more varied in construction because they have access to a wider range of natural material, but the underlying requirement — shelter from weather and predators — remains constant.
Burrows in Soil
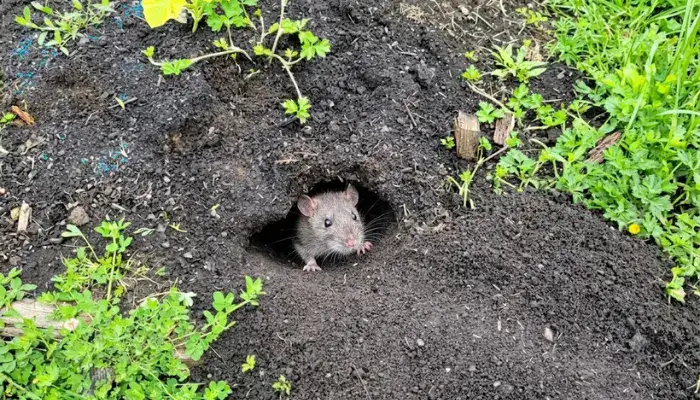
Norway rats are proficient diggers and will excavate burrow systems along foundations, under sheds, or beneath dense ground cover. A burrow entrance is typically a smooth, rounded hole about two to four inches across, often with a slightly worn path leading to and from it.
Woodpiles and Debris Piles
Stacked firewood, brush piles, and construction debris left in a yard create ideal gaps for building, offering both material and structural cover in one location.
Dense Vegetation and Ivy
Thick ground cover such as ivy, overgrown shrubs, or unmaintained hedges gives a concealed travel corridor between a hiding spot and a food source, and often becomes the site itself.
Tree Cavities and Palm Fronds
Climbing species will settle in hollow tree limbs, dense palm frond skirts, or overgrown vines climbing a fence or wall — all locations that keep them off the ground and closer to elevated food sources like fruit trees.
Signs of an Active Infestation
Not every pile of shredded material indicates an active infestation. The signs below, especially in combination, distinguish a currently occupied area from an old, abandoned one.
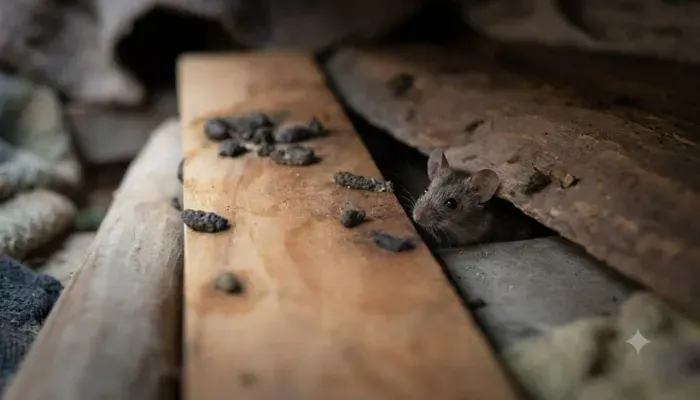
- Fresh droppings — dark, moist, and clustered close to the nesting site rather than scattered and dried out
- Recently shredded material — bright, un-faded fibers rather than dusty, sun-bleached debris
- Grease and rub marks — dark smudges along frequently traveled edges, beams, or baseboards caused by oil on fur
- Gnaw marks — fresh, light-colored wood exposed at chew points, as opposed to weathered marks
- Active sounds — scratching, scurrying, or light squeaking, most noticeable in the hour after sunset
- A persistent ammonia-like odor — stronger and more concentrated the closer you get to the source
How to Confirm Without Disturbing the Area
A flashlight and a slow visual sweep of suspected areas — attic corners, the back of storage shelving, gaps behind appliances — is usually enough to confirm activity without needing to physically move or touch anything. Placing a thin layer of flour or baby powder near a suspected entry point can also reveal fresh tracks within 24 hours, confirming current use without disturbing the interior.
A Practical Inspection Checklist
Start at the perimeter
Walk the full exterior foundation line looking for burrow openings, gnawed vents, or gaps larger than a half-inch around utility penetrations.
Check the attic
Scan corners and insulation depressions rather than walking the full space, since disturbing insulation can scatter contaminated material.
Inspect storage areas
Move along shelving from one end to the other rather than pulling boxes at random, noting any gnawed corners or shredded contents.
Note sound patterns
They are most active in the hour after sunset and again just before sunrise; recording when sounds occur helps narrow down which void is active.
Photograph evidence
Document droppings and gnaw marks before cleanup. This helps track activity and assists any professional inspection that follows.
How Fast a Single Source Turns Into a Full Infestation
Reproduction is the single biggest reason a problem discovered early is far easier to resolve than one left for months. A female reaches sexual maturity in as little as six to eight weeks and can produce a new litter roughly every three weeks thereafter, with litter sizes commonly ranging from six to twelve pups. Under stable conditions — steady food, shelter, and no predation pressure — a single breeding pair can theoretically be behind dozens of descendants within a single year, though real-world mortality and territorial competition usually keep growth well below that ceiling.
What this means practically is that a site found within the first few weeks of establishment usually involves a single family unit confined to one void. An area left undisturbed for several months is far more likely to have already produced satellite hiding spots nearby, since younger individuals disperse short distances once a colony reaches capacity for its space and food supply. This is why an inspection should never stop at the first location found — checking adjacent voids, the opposite side of a shared wall, or a neighboring section of attic insulation is a necessary next step.
Seasonal Patterns in California
California's mild climate means they rarely go fully dormant, but behavior still shifts with the seasons. In late fall and winter, they move indoors more aggressively in search of warmth, which is when attic and wall-void issues spike in frequency. Outdoor burrow activity, by contrast, tends to peak in spring and early summer when soil is workable and ground cover is dense enough to conceal a burrow entrance.
Irrigation patterns also play a role specific to this region: landscaped yards with regular watering schedules maintain the soft, moist soil conditions perfect for digging year-round, which is one reason burrow activity near sprinkler lines and drip irrigation is more common in maintained residential landscaping than in naturally arid areas.
Infestations in Vehicles and Engine Bays
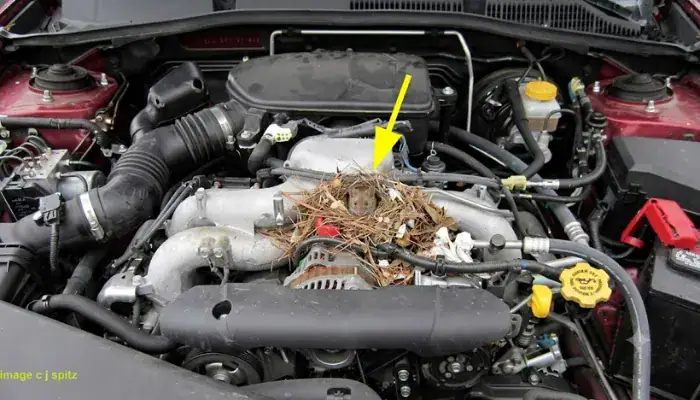
Vehicles parked for extended periods, particularly in garages or under carports, are an often-overlooked hiding site. The engine bay offers warmth from a recently run engine, protective cover, and easy access to wiring and insulation material they will readily shred. A presence here is usually confirmed by chewed wiring insulation, shredded material wedged near the air filter housing or firewall insulation, and, occasionally, droppings on the ground beneath the vehicle. Leaving a hood slightly ajar or starting the engine periodically during long storage can discourage establishment, since they favor undisturbed, silent locations over ones with regular vibration and noise.
Roof Rat vs. Norway Rat Nesting Behavior
| Factor | Roof Rat | Norway Rat |
|---|---|---|
| Preferred elevation | Above ground — attics, trees, upper walls | Ground level or below — burrows, crawl spaces |
| Climbing ability | Excellent; thrives in canopy and roofline | Poor; rarely settles above first floor |
| Burrowing behavior | Minimal | Extensive; digs multi-entrance burrow systems |
| Typical outdoor site | Palm fronds, dense trees, vine-covered fences | Woodpiles, foundation edges, dense ground cover |
Because the two species settle so differently, correctly identifying which one you are dealing with changes where an inspection should focus first. For a full side-by-side comparison of appearance, droppings, and travel patterns, see our guide on telling roof rats and Norway rats apart.
Health and Safety Concerns
An infestation source is not just a structural nuisance. Accumulated droppings and dried urine within and around the site can harbor pathogens, and disturbing the material without precautions risks releasing airborne particles. According to the CDC's guidance on rodents and disease, dried rodent excreta is one of the primary transmission routes for hantavirus, particularly in enclosed, poorly ventilated spaces like attics and crawl spaces.
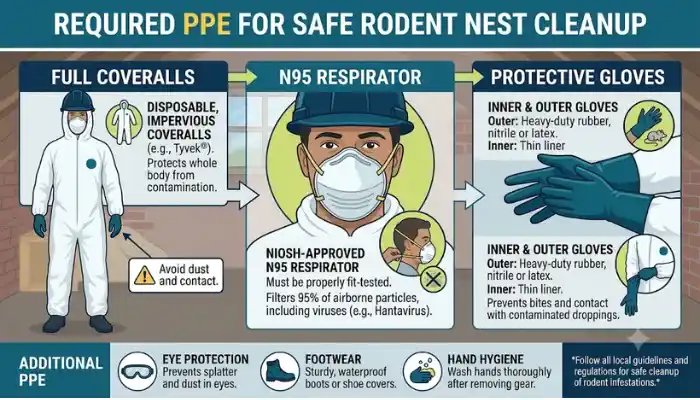
Because of this, cleanup requires more than simply discarding the material. Contaminated areas need to be sanitized using specific ventilation and disinfection steps to avoid aerosolizing hazardous particles. Our detailed walkthrough on safely cleaning areas contaminated by rodent infestation covers the full process, including which products to avoid and how long to ventilate a space before beginning cleanup.
What Not to Do
- Do not vacuum or sweep dry droppings or debris — this aerosolizes particles
- Do not handle the material without gloves and, ideally, an N95 or higher-rated respirator
- Do not seal an entry point until you have confirmed the site is no longer active, or you risk trapping them inside a wall or attic void
Steps to Take Upon Discovery
1. Identify the Full Extent of the Colony
A single visible area rarely represents the entire population. They often maintain secondary locations nearby, so a thorough inspection should extend to adjacent voids, not just the confirmed spot.
2. Avoid Direct Contact
Ventilate the space for at least 30 minutes before entering, and use appropriate personal protective equipment if any handling is required, consistent with the precautions outlined by the EPA's integrated pest management guidance.
3. Address Entry Points
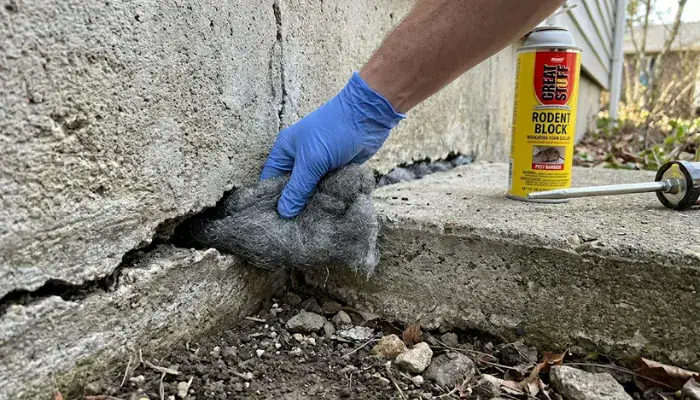
Once activity has stopped, seal gaps, vents, and foundation cracks with rodent-proof materials such as steel wool combined with sealant, since they can gnaw through most softer materials.
4. Remove Attractants
Store food in sealed containers, eliminate standing water, and clear dense vegetation or debris piles within a few feet of the structure to reduce the likelihood of a new colony forming nearby.
Found a rat nest or mice nest in your home? Don't risk your health. PestPunt provides 24/7 emergency rodent removal across California. Our licensed technicians handle nest removal, sanitization, and exclusion safely. Call (888) 217-6759 for immediate assistance.
Risks in Multi-Unit and Commercial Properties
Apartment buildings, restaurants, and warehouses face a distinct challenge: shared wall systems and utility chases allow a single infestation to serve as a source population for multiple units at once. A colony established in a shared attic or a chase wall between two adjoining units can produce activity reports from neighboring tenants who have no direct hiding site of their own, which often delays identification of the actual source. Property managers dealing with recurring complaints across multiple units should treat the building's shared infrastructure — not each individual unit — as the primary inspection target.
For commercial rodent control in California, PestPunt offers discreet, after-hours service for restaurants, warehouses, and retail spaces. Learn more about our commercial services.
Prevention: Keeping New Nests From Forming
- Trim tree branches and vines back at least several feet from the roofline to remove climbing access for roof rats
- Elevate and space woodpiles away from exterior walls
- Inspect attic vents, roof eaves, and foundation gaps seasonally, since seal integrity degrades over time
- Keep garages and sheds decluttered enough to allow a visual check of corners and storage boxes
- Address moisture issues promptly, since damp conditions attract both rodents and the insects that sometimes accompany them
Guidance from the University of California Statewide IPM Program's management notes echoes this approach, emphasizing exclusion and habitat modification as more durable long-term solutions than reactive trapping alone.
Common Misconceptions
"If I don't see droppings, there's no activity nearby."
Droppings accumulate near feeding and travel routes more than directly inside the sleeping area itself, since they typically defecate as they move rather than inside their resting zone. A clean-looking void can still contain an active colony a few feet away along a wall cavity or joist bay.
"One trap will solve the problem."
A single trap addresses individuals encountered along a travel path, not the source itself. Without locating and clearing the main hiding spot and closing the entry point that leads to it, new individuals — including offspring already born in the void — will continue using the same space.
"Ultrasonic repellents will drive out an established colony."
Once a site is established with a reliable food source nearby, they habituate to consistent sound sources within days. Repellent devices are more useful as a minor deterrent during prevention than as a solution for an occupied space.
"Cats or outdoor predators will keep the population in check."
Outdoor predators may reduce activity in open yard areas but have no access to spaces inside attics, wall voids, or sealed crawl spaces, where the majority of established indoor colonies actually reside.
When to Bring in a Professional
A minor occurrence with limited activity can sometimes be addressed independently, but multiplying droppings, multiple locations, or activity inside inaccessible wall voids typically signal a colony that has outgrown a do-it-yourself response. Professional inspection allows for a full property assessment, safe removal, sanitation, and exclusion work that closes off future entry points rather than just treating the visible symptom.
The National Pest Management Association recommends a professional inspection whenever activity is suspected in an enclosed structural space, given the difficulty of confirming full colony size without specialized tools like borescopes and thermal imaging.
Explore the full range of identification and prevention resources on the PestPunt home page, including species-specific guides and seasonal prevention checklists.
Frequently Asked Questions
A rodent nest is typically a loosely woven ball of shredded material such as insulation, cardboard, fabric, or dried vegetation, roughly the size of a softball to a soccer ball. It is often tucked into a dark, undisturbed void and surrounded by droppings, gnaw marks, and a stale odor.
Rats and mice build nests in attics, wall voids, crawl spaces, insulation layers, cluttered garages, and rarely-used storage boxes. They seek locations that are dark, quiet, insulated from temperature swings, and close to a food or water source. Roof rats prefer attics and trees, while Norway rats favor ground-level burrows and crawl spaces.
A single nest can start with one breeding pair but often grows into a family group of six to twelve individuals within a few months, since a female can produce a new litter roughly every three weeks under favorable conditions.
To safely remove a rat nest or mice nest: 1) Wear N95 mask and gloves, 2) Do not sweep or vacuum dry droppings, 3) Remove the nest and contaminated materials, 4) Sanitize the area with disinfectant, 5) Seal all entry points with steel wool and sealant, and 6) Consider hiring a professional rodent removal service for large or inaccessible infestations.
Roof rats prefer to nest above ground in attics, trees, and upper wall voids due to their excellent climbing ability. Norway rats prefer ground-level or below-ground locations such as burrows, crawl spaces, and basement clutter.
You should call a professional rodent removal service if you notice multiplying droppings, multiple nesting locations, activity inside inaccessible wall voids, or if you lack the proper personal protective equipment (PPE) like an N95 respirator to safely handle contaminated materials.
Rodent nest removal typically costs between $200 and $800 depending on infestation severity, nest location, and property size. Attic nest removal and cleanup may cost $400-$1,500. Most professional rodent control companies offer free inspections and provide upfront quotes.
Squirrel nests in attics are larger than rat or mice nests and made of leaves, twigs, and shredded insulation. Do not attempt removal during breeding season (spring/fall). Contact a professional wildlife removal service that can safely relocate the squirrels, seal entry points, and clean contaminated insulation.
Schedule a Professional Rodent Inspection in California
If you've found shredded insulation, heard scratching at night, or noticed an ammonia smell in your attic — you need a professional to locate the source and resolve it safely. Call (888) 217-6759 today for a thorough assessment.
Information on this page is drawn from public health guidance published by the Centers for Disease Control and Prevention and the California Department of Public Health, as well as industry best practices. It is provided for general educational purposes and is not a substitute for professional pest inspection or medical advice.