How to Find a Mouse Nest in Walls or Attic: A Practical 2026 Guide for Homeowners
You hear scratching above the ceiling at 2 a.m., or you find droppings behind the stove. Mice are in your house, and somewhere inside the structure they have built a nest. Finding that nest is the single most useful step you can take, because the nest tells you where the mice live, how long they have lived there, and how many you face. This guide shows you how to find a mouse nest in walls and attics, how to tell mice from rats, how to stay safe while you search, and what to do next.
What a Mouse Nest Looks Like — At a Glance
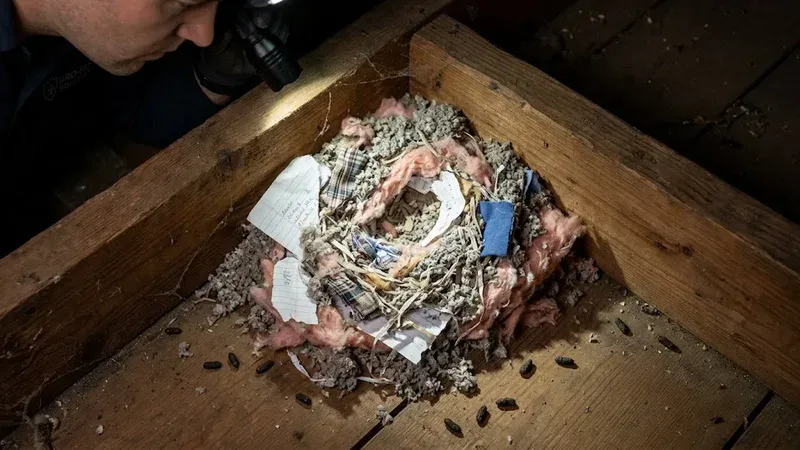
What to look for: Loose ball or cup of shredded insulation, paper, fabric, or plant fibers — usually the size of a softball or smaller.
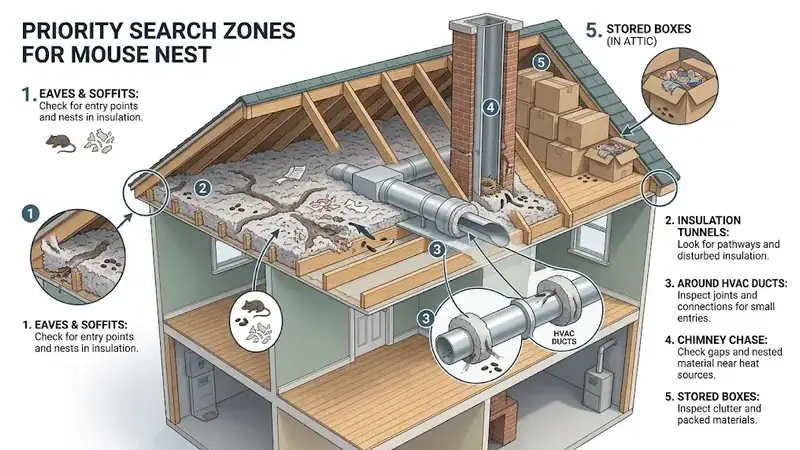
Where to search: Attic insulation near the eaves, wall voids behind kitchen appliances, areas around ducts, storage boxes in garages, crawl spaces, and chimney chases.
Safety first: Wear an N95 respirator and gloves, wet contamination with disinfectant, and never sweep or vacuum dry droppings.
Key takeaway: Control the mice and seal entry points before you remove the nest — otherwise you scatter the colony and orphan pups.
What a Mouse Nest Looks Like
A mouse nest is a loose, rounded shelter that a female mouse builds from shredded soft material. Mice do not build neat structures. They tear, gather, and pile. A typical nest forms a cup or a ball roughly the size of a softball or smaller, with a hollow center where the mouse sleeps or raises pups.
Common Nesting Materials
Mice use whatever soft material they can reach. Inside a typical home, that list usually includes:
- Shredded fiberglass or cellulose insulation
- Torn paper, cardboard, and paper bags
- Fabric scraps, old clothing, and upholstery stuffing
- Dry leaves, grass, and plant fibers carried in from outside
- Pet bedding and pet food bag fragments
- Cotton, string, and carpet fibers
What You Will Find Around the Nest
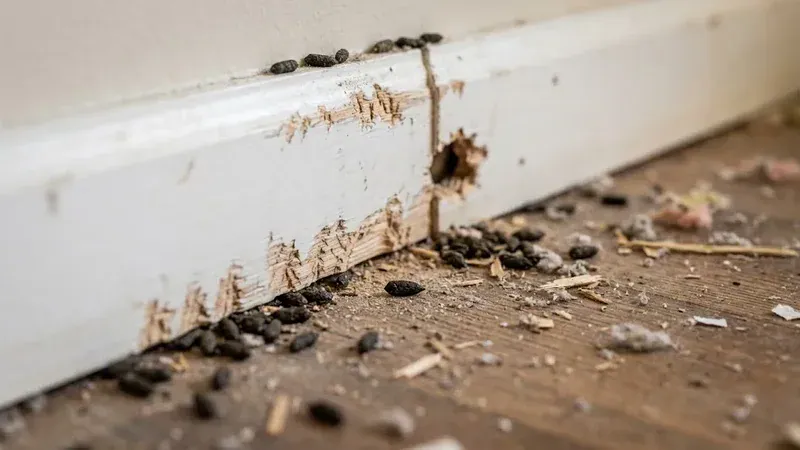
The nest rarely sits alone. Mice leave a trail of evidence within a few feet of it. Expect to see dark, pointed droppings about one quarter inch long, urine stains, gnaw marks on wood and wiring, and bits of food. If you see the nest but no droppings, the nest may be old and abandoned. If you see fresh, shiny, dark droppings, the nest is active.
Why Mice Nest in Walls and Attics
Mice choose nest sites based on three needs: warmth, shelter from predators, and a short walk to food. Walls and attics meet all three. Wall voids stay dark and undisturbed, and they sit next to kitchens and pantries. Attics hold insulation that doubles as free bedding, and they stay warm through winter nights.
The Climate Factor
Homes in most regions face year-round rodent pressure. Mild winters let mice breed through more months than in colder areas. Heavy winter rain also pushes rodents from soil burrows and drainage areas toward dry structures. Many homes also have gaps where roofing meets siding, vented eaves, and utility lines that run into walls. Each of those gaps gives mice a way in.
How Fast a Nest Becomes an Infestation
House mice breed quickly. A female typically carries pups for about three weeks, and she can breed again soon after giving birth. Pups reach breeding age at roughly two months. A single nest found in autumn can turn into several nests by spring. That timeline explains why you should act on the first signs, not wait for the problem to grow.
Early Signs That a Mouse Nest Exists Near You
You do not need to see a mouse to confirm a nest. Look and listen for these signs first. They narrow your search to the right part of the house.
Sounds
Mice are most active between dusk and dawn. Listen in the quiet hours. Light scratching, rapid scurrying, and faint squeaking inside a wall or above a ceiling point to travel routes near a nest. Gnawing sounds often come from sharp, repeated rasping. Stand still in each room for several minutes and note which wall or ceiling section carries the noise.
Droppings
Mouse droppings look like dark grains of rice with pointed ends. Fresh droppings appear dark, soft, and shiny. Old droppings turn gray and crumble. Heavy clusters near a baseboard, behind an appliance, or along an attic joist usually mark a feeding or nesting zone.
Grease Marks and Gnaw Marks
Mice follow the same paths along walls. Their oily fur leaves dark smudges along baseboards, pipes, and joists. Gnaw marks appear as small, rough-edged holes in cardboard, plastic, wood, and drywall corners. Fresh gnawing leaves pale, clean wood shavings.
Odor
An active nest gives off a stale, musky, ammonia-like smell from accumulated urine. The odor strengthens in warm, closed spaces. A sharp, rotting smell instead points to a dead mouse in a wall void.
Pet Behavior
Dogs and cats often detect a nest before you do. If your pet stares at a wall, paws at an outlet area, or sniffs one spot repeatedly, check that spot. Pets cannot confirm a nest, but they tell you where to begin.
Tools and Safety Gear You Need Before You Start
Preparation protects your health and speeds the search. Gather these items before you enter an attic or open a wall access point.
Inspection Tools
- Bright flashlight or headlamp: A headlamp keeps both hands free for climbing and moving insulation.
- Inspection mirror: A small angled mirror shows you behind pipes and into tight corners.
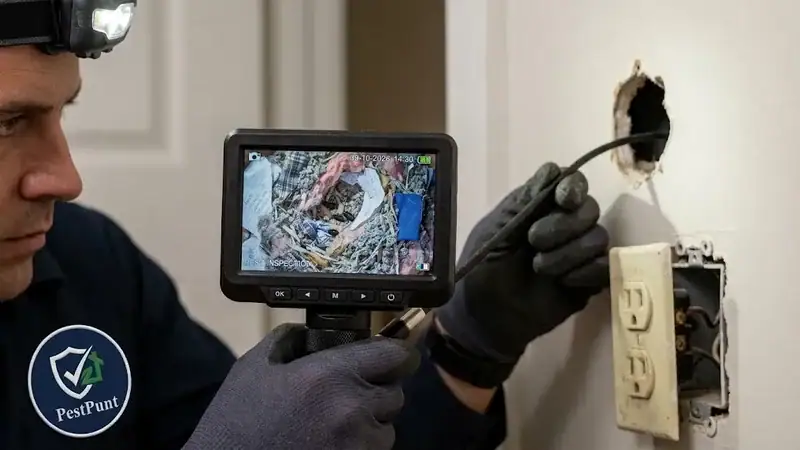
- Borescope or inspection camera: A slim camera on a flexible cable lets you look inside a wall through a small hole or outlet opening.
- Thermal imaging camera: A phone-attached or handheld thermal camera highlights warm patches inside walls at night, when mice rest in nests.
- Stud finder and moisture meter: These tools help you locate cavities and rule out leaks as a cause of odor.
- Flour or talcum powder: A light dusting across a suspected path shows tiny footprints the next morning.
Protective Gear
- A fitted N95 respirator or better
- Disposable nitrile or rubber gloves
- Safety goggles
- Long sleeves, long pants, and closed shoes
- A disposable coverall for dusty attics
Attic Hazards to Respect
Attics get extremely hot in summer. Search in the early morning or evening during warm months. Step only on joists or on boards laid across joists. Drywall will not hold your weight, and a missed step can send your leg through a ceiling. Watch for exposed wiring, and never touch wires that mice may have damaged.
How to Find a Mouse Nest in Your Attic: Step by Step
Attic nests are the easiest nests to reach, but they hide well in insulation. Follow this sequence to search without missing key zones.
Inspect the Access Point and Entry Area
Open the hatch slowly and shine your light across the floor before you step inside. Check the area around the hatch for droppings, shredded material, and fresh tracks. Mice often leave their heaviest signs near the route they use most.
Follow the Perimeter
Mice travel along edges. Walk the outer rim of the attic where the roof deck meets the top of the exterior walls. Pay extra attention to the eaves, soffit vents, and corners. Look for dark trails pressed into insulation, which indicate repeated travel.
Read the Insulation
Scan the insulation for tunnels, flattened channels, and clumped, shredded patches. Mice tunnel through loose-fill insulation and nest inside it. Lift suspicious clumps with a long stick or a gloved hand, only after you wet and inspect the surface. A nest often sits at the bottom of an insulation tunnel, near a warm duct or a wall top plate.
Check Around Ducts, Chimneys, and Pipes
Ducts, flues, and plumbing penetrations offer warmth and cover. Look behind ductwork, around the base of any chimney chase, and near vent pipes. Check the gaps where wires or pipes enter the attic from the walls below. Mice use those gaps as highways between the attic and wall voids.
Inspect Stored Items
Cardboard boxes, holiday decorations, old clothes, and stored papers make perfect nests. Open each box carefully. Look underneath stacked items, where mice build against the floor and the warm insulation.
Mark and Document
When you find a nest or heavy sign, do not remove it. Photograph it from a safe distance, mark the location with a piece of flagging tape, and note nearby entry points. This record helps you or a technician plan treatment and sealing.
How to Find a Mouse Nest Inside Walls
Wall nests are harder to confirm because you cannot see them. You can still locate them with a combination of listening, tracking, and low-damage inspection tools.
Map the Noise
Spend two or three quiet evenings in the rooms where you suspect activity. Press a drinking glass or a stethoscope against the wall and listen. Mark the loudest spots with removable tape. A cluster of marks across a few feet of wall usually points to a nest or a heavily used route.
Follow the Evidence to the Wall
Check behind and under the refrigerator, stove, dishwasher, and washing machine. These appliances sit against walls that hold plumbing and wiring, and mice enter wall voids through the gaps around those lines. Check under sinks, where pipe holes often leave large openings. Look inside cabinets for gnaw holes in the back panels.
Use a Dust Test
Spread a thin line of flour or talcum powder along the base of the suspected wall for one night. Tiny footprints and tail drags tell you which direction the mice travel. Follow the trail toward the wall opening or the most active spot.
Use a Thermal Camera at Night
A nest with live mice holds body heat. In the cooler hours of the night, scan the suspected wall with a thermal camera. A small, warm patch within a stud bay, away from pipes and ducts, suggests a nest. Thermal readings need interpretation, because plumbing, wiring, and sunlight on exterior walls also create warm patches. Cross-check any thermal hit with sound and droppings.
Look Inside With a Borescope
Remove an outlet cover (after you turn off the breaker for that circuit) or drill a small inspection hole where a stud bay is clear of wiring and pipes. Feed the borescope into the cavity and look up, down, and sideways. You can see shredded insulation, nest material, and droppings without cutting a large opening.
Check Wall Tops and Floor Transitions
Mice move between wall voids, attics, and crawl spaces through the top plates and bottom plates of walls. Check the attic side of interior walls and the crawl space or garage side of the bottom plate. Many wall nests connect to one of these openings.
Where Else Mouse Nests Hide Inside Homes
Do not limit your search to walls and attics. Mice build several nests, and they place them in the warmest, quietest spots they can reach. If you want a deeper room-by-room breakdown, read our guide on where mice hide during the day. The list below covers the most common secondary locations.
Common Secondary Nest Sites
- Behind kitchen appliances: Warmth from motors and nearby food make this a top location.
- Garage storage: Cardboard boxes, old furniture, and car engine compartments all offer shelter. Mice sometimes nest in a parked car's air filter box.
- Crawl spaces and basements: Insulation, stored items, and plumbing penetrations give mice both materials and routes.
- Inside furniture and appliances: Recliners, box springs, and the backs of couches hold plenty of soft stuffing.
- Pantry corners and cabinet backs: Nests here sit within steps of food.
- Chimney chases and fireplace flues: These offer dark, sheltered spaces that connect upper and lower floors.
Why Mice Keep More Than One Nest
Mice often keep a main nest for raising pups and several smaller satellite nests for resting and food storage. When you find one nest, assume at least one more exists. Treat the whole structure, not only the first discovery.
Mouse Nest or Rat Nest? How to Tell the Difference
Attics across the country host both house mice and roof rats. The two animals need different control strategies, so identify the species before you act. Roof rats climb well and favor attics, tree-adjacent rooflines, and upper wall voids in warmer regions. House mice stay lower and also favor wall voids, garages, and kitchens.
| Sign | House Mouse | Roof Rat |
|---|---|---|
| Droppings | About 1/4 inch long, pointed ends, scattered | About 1/2 inch long, spindle-shaped, often in groups |
| Nest size | Softball-size or smaller, loosely shredded | Larger, bulkier, often a mound of mixed debris |
| Typical location | Wall voids, behind appliances, low storage, garages | Attics, upper wall voids, near trees and rooflines |
| Gnaw marks | Small, fine scratches | Larger, rougher gnawing |
| Rub marks | Faint, along walls | Darker, along beams and pipes in higher areas |
| Entry gap | About 1/4 inch | About 1/2 inch |
If your attic nest is larger than a softball, or you see half-inch droppings and fruit remnants such as citrus or avocado, you may have roof rats. In that case, trim tree branches that touch the roof and call for professional help sooner. If you suspect rats, our page on fast rodent control explains how same-day dispatch works.
What to Do After You Find a Mouse Nest
Finding the nest is the first half of the job. What you do next decides whether the mice leave or simply move to another part of your house.
Do Not Remove the Nest First
Many homeowners rip out the nest the moment they see it. That reaction scatters adult mice, orphans any pups, and leaves you with dead animals in places you cannot reach. Control the mice first, then remove the nest.
Step 1: Identify and Seal Entry Points
Mice enter through gaps as small as one quarter inch. Walk the exterior and look for gaps around pipes, vents, garage door seals, rooflines, and foundation cracks. Use durable materials:
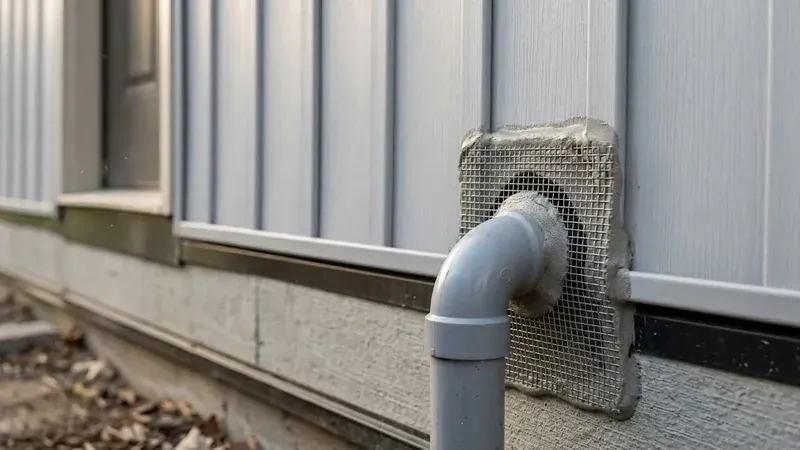
- Hardware cloth (quarter-inch mesh): Cover vents and larger openings.
- Metal flashing and sheet metal: Cover gaps along rooflines and door bases.
- Cement-based patching compound: Fill holes in stucco and foundation walls.
- Weatherstripping and door sweeps: Close the gap under exterior doors, especially the garage door.
- Copper mesh or steel wool combined with sealant: Pack small holes around pipes and cables. Use steel wool only with a sealant over it, because mice can pull loose steel wool out.
Step 2: Reduce Food and Water Sources
Store pantry food, pet food, and birdseed in sealed metal or thick plastic containers. Fix leaking pipes and dripping air conditioning lines. Remove fallen fruit and clear dense ground cover around the foundation.
Step 3: Choose a Control Method
Snap traps remain a reliable, direct choice when you place them correctly. Set them perpendicular to walls, with the trigger end near the wall, in the paths you identified through droppings and rub marks. Place traps in pairs along travel routes. Keep traps away from children and pets, and use enclosed or tamper-resistant stations where needed.
Rodenticides carry serious risks for pets, children, and wildlife, including birds of prey. Some products face restrictions on use. Review the EPA guidance on rodenticides before you use any poison, and consider professional help for anything beyond a small, simple problem.
Step 4: Remove the Nest and Clean the Area
After trapping shows that activity has stopped, remove the nest with full protective gear. Spray the nest and surrounding droppings with a disinfectant or a 1:10 bleach-water solution until soaked. Wait the contact time on the product label. Then wipe and bag the material in sealed plastic bags and dispose of it according to local rules.
Step 5: Replace Damaged Insulation
Insulation that carries urine and droppings loses its insulating value and holds odors. Remove and replace contaminated sections. Clean the area before you add new insulation, and verify that all entry points are sealed first.
Health Risks and Safe Cleanup of Mouse Nests
Mouse nests carry real health risks. Droppings, urine, saliva, and nesting material can contain pathogens. The U.S. Centers for Disease Control and Prevention (CDC) explains that rodents can spread diseases through contact with their waste and through contaminated dust. You can read their guidance on rodent-related illness and prevention.
Diseases Linked to Rodent Nests
- Hantavirus: Deer mice, which live across much of North America, can carry hantavirus. People can inhale the virus when they disturb dry, contaminated dust.
- Salmonellosis: Mice can contaminate food and surfaces with Salmonella bacteria.
- Lymphocytic choriomeningitis virus (LCMV): House mice can carry this virus and spread it through urine, droppings, and saliva.
Safe Cleanup Steps
Open doors and windows and ventilate the area for at least 30 minutes before you begin. Put on gloves, goggles, and a fitted respirator. Spray droppings, urine, and nesting material with disinfectant until thoroughly wet. Wait for the label contact time, then wipe up with paper towels. Seal waste in a plastic bag, then place that bag inside a second bag, and throw it out. Disinfect floors, shelves, and tools. Wash your gloves while you still wear them, then remove and discard them. Wash your hands with soap and warm water.
When to Seek Medical Advice
If you develop fever, muscle aches, cough, or breathing trouble within several weeks after cleaning or exposure to rodent waste, tell your doctor about the exposure. Early reporting helps clinicians consider the right tests.
DIY Search vs. Professional Inspection
You can find and confirm many mouse nests on your own, especially when you have a small problem and easy attic access. Some situations call for professional inspection. This section helps you decide.
When a DIY Search Works
- You see signs in one room, and the attic is easy to walk.
- You find a single nest, and trapping controls the activity within days.
- You can safely reach and seal every entry point you find.
When Professional Help Makes Sense
- You hear activity in walls but cannot locate the nest after repeated attempts.
- You find large nests, heavy droppings, or signs of roof rats.
- Activity continues after a week of trapping.
- Your attic is tight, steep, or unsafe to enter.
- You suspect chewed wiring or a fire risk.
- Someone in your home has asthma, a weakened immune system, or pregnancy, and you want to reduce exposure during cleanup.
What a Thorough Inspection Covers
A proper rodent inspection checks the full property, not only the room where you saw mice. A trained technician examines the roofline, vents, foundation, attic, crawl space, and utility entries. They identify the species, locate nests, map travel routes, and recommend a sealing and control plan. They also explain which cleanup steps you can handle and which need protective equipment.
Prevention Checklist: Keep Mice From Nesting Again
Once you remove a nest, prevention protects your work. Use this seasonal checklist to stay ahead of rodent pressure.
Exterior
- Seal every gap larger than one quarter inch around pipes, cables, vents, and foundation edges.
- Cover attic and crawl space vents with quarter-inch hardware cloth.
- Install door sweeps on all exterior doors, including the garage door.
- Trim tree branches so they sit at least several feet away from the roof.
- Keep firewood, lumber, and debris away from the house walls.
- Clear dense ivy and ground cover that touches the foundation.
Interior
- Store dry food and pet food in sealed containers.
- Replace cardboard storage boxes with sealed plastic bins, especially in garages and attics.
- Clean behind appliances twice per year.
- Fix leaks promptly.
- Keep clutter low in basements, closets, and garages.
Seasonal Habits
Inspect your home in early autumn, before cooler and wetter weather pushes rodents indoors. Check again in late winter and early spring, when breeding picks up. Walk the attic at least once per season, and look for fresh droppings, shredded insulation, and new gnaw marks. Early detection costs far less than a full infestation.
Common Mistakes When You Search for a Mouse Nest
1. Removing the Nest First
This action scatters the mice and leaves orphaned pups behind. Always control activity first.
2. Using Only Steel Wool or Foam
Mice can chew through expanding foam and pull out loose steel wool. Combine steel wool or copper mesh with a durable sealant, or use hardware cloth and metal flashing.
3. Ignoring Roof Rats
A large attic nest may not belong to a mouse. Identify the species before you choose traps and baits.
4. Skipping Protective Gear
Dust from droppings and nests can harm your lungs. Wear a respirator and gloves every time.
5. Treating Only One Spot
Mice build multiple nests. Search the whole structure, then seal every entry point.
6. Using Poison Without a Plan
Poison can cause mice to die inside walls, which creates odors that last for weeks. Poison also threatens pets, children, and wildlife. Choose traps and exclusion first, and consult a professional if you consider other methods.
Frequently Asked Questions About Finding a Mouse Nest
A mouse nest looks like a loose, cup-shaped or ball-shaped pile of shredded soft material, such as paper, insulation, fabric, and dry plant fibers. Most nests measure about the size of a softball or smaller. Droppings, urine stains, and gnawed edges often surround the nest.
Listen for scratching, scurrying, or squeaking inside walls at night. Look for droppings near baseboards, grease marks along walls, and gnawed holes. Pets that stare or paw at one wall spot also signal activity. A thermal camera or borescope can confirm a nest without major wall damage.
Do not remove a nest before you control the mice and seal entry points. Disturbing a nest too early scatters mice into other parts of the house. When you do remove it, wear gloves and a respirator, wet the area with disinfectant first, and never sweep or vacuum dry droppings.
One nest can hold a female and a litter of pups, and several related adults may share a nest. Female house mice produce multiple litters per year, so a small nest can grow into a large infestation within a few months.
Both occur in attics across the country. Roof rats commonly nest in attics in warmer regions, while house mice favor wall voids and low spaces. Rat droppings measure about half an inch long, while mouse droppings measure about one quarter inch. Rat nests are larger and bulkier.
A mouse nest produces a stale, musky, ammonia-like odor from accumulated urine. The smell grows stronger in warm, enclosed spaces such as attics and wall cavities. A sharp rotting smell may indicate a dead mouse nearby.
Yes. Mouse droppings, urine, and nesting material can carry pathogens, including hantavirus from deer mice, Salmonella, and lymphocytic choriomeningitis virus. The CDC advises wet cleaning with disinfectant and protective gear instead of sweeping or vacuuming.
An adult mouse can squeeze through an opening about one quarter inch wide, roughly the diameter of a pencil. Seal any gap larger than that with durable materials such as hardware cloth, metal flashing, or cement-based patching compounds.
Final Takeaways
You find a mouse nest by following evidence: sounds, droppings, grease marks, odor, and pet behavior. Search attics along the perimeter, through insulation tunnels, and around ducts and chimney chases. Search walls with sound mapping, dust tests, thermal cameras, and borescopes. Identify the species, because attics host both mice and roof rats. Control the mice before you remove the nest, seal every entry point, and clean with full protective gear and wet methods.
If you cannot find the nest, if activity continues, or if your attic is unsafe to enter, call PestPunt at (888) 217-6759. Our field representatives travel directly to your property anywhere in the United States.
Mobile Rodent Control Services
Find the Nest Before It Becomes an Infestation
Finding a mouse nest is the first step. Taking action before the colony spreads is the second. Contact our team at (888) 217-6759 to schedule a full property inspection and get a tailored plan to locate, remove, and prevent mice from returning.